
| Settingup Unattended, Secure, Multi-Operation System Installation Medium | |
|
1. INTRODUCTION It is a known fact that in our era a computer connected to the Internet network is faced with many threats. Viruses making use of the gaps of the operating system in use, malicious users with other aims and many similar threats are always confronting the users. Being units of university computer centers we are always recommending our users to upkeep their computers with updated latest operating systems and to keep various security software installed, especially keeping in mind that we are in a medium using Microsoft Windows Operating Systems. However, it is a fact that when first installed any Microsoft Windows version is susceptible to threats. To connect to the Internet for a computer in such a state will result in immediate virus infection or the access to that computer by some different methods. In the aftermath the user, wanting to use the computer safely, generally approaches the computer center staff and causes loss of time and workforce. If for every installation all the updates of the operating system till that point are carried out and the necessary software for the user is installed, then loss of time and workforce can be minimized. We as the METU Computer Center are preparing an installation CD for the use of our academic and administrative users, a CD which does not require any questions apart from a few necessary ones, where all the updates of the Windows XP Operating system are automatically performed and some certain software that is presumed to be necessary for the user is installed. How this CD is prepared is the agenda of the first section of this text. Next, the preparation of a security CD which performs the updates and does the security settings for the use of current users of the Windows Operating system will be explained. At circles, such as universities, having computers with many different types of hardware and different operating systems being used concurrently, the emerging issue for the computer center staff becomes having to tag along installation CDs/DVDs for any operating system and making use of the appropriate one depending on the need. To solve this or similar problems a DVD can be prepared incorporating the installations of different operating systems and one even providing the installation of different configurations for the same operating system. The preparation of such a DVD will be introduced in our next issue. 2. SETTING UP AN UNATTENDED INSTALLATION CD FOR MICROSOFT WINDOWS To understand how all the updates will be automatically installed, one has to understand how the automatic CD is prepared. When responses to the questions asked and the settings to be adjusted during the installation of Microsoft Windows operating system is predefined in a file named winnt.sif all the settings will be adjusted automatically during installation and no questions will be directed to the user. The mentioned file can either be manually created from scratch or may be created by the Microsoft software Deployment Tools automatically and can then later be modified to custom. When creating the winnt.sif file by means of the Deployment Tools software the required settings during installation are determined by the help of a graphic interface and the related commands are scripted into the file. When making use of the Deployment Tools, on the screen shown in Figure-1 it may be decided whether the installation will be performed automatically without asking the user any questions or will only the certain parts be automated. With the installation CD prepared by the METU Computer Center some settings are left to the discretion of the user. For instance, giving the administrator password automatically while performing an installation over all the campus would result in all computers having the same password and this would be a big breach of security. 
Figure-1 On the screen seen in Figure-2 the automatic settings under each heading can be determined thus forming the winnt.sif file easily. The file mentioned should be saved in the I386 directory in the installation CD. As mentioned earlier, changes can be made on this file.
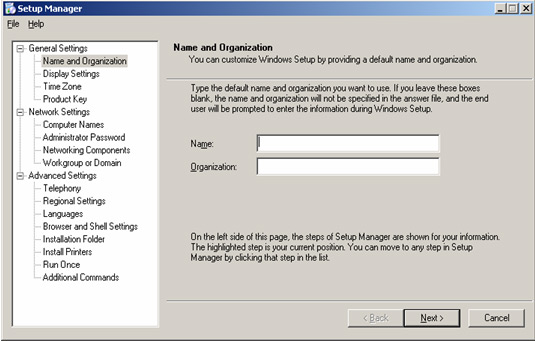
Figure-2
Below is a sample winnt.sif file for Microsoft Windows XP:
For other properties to be added to the winnt.sif file, the help files which arrive with the Deployment Tools may be reviewed. Similar settings for auto installation can be done for Windows 98 and Windows 2000 as well. To create the file for these settings Windows Deployment Tools for Windows 2000 and Microsoft Batch 98 for Windows 98 programs can be used. 2.1. Adding the Service Pack Files to the Microsoft Windows installation: Since the installation CD being unattended alone does not chip in with regards to security, the installation must also include auto installation of all the updates released by Microsoft. The first step during this process should be to integrate the latest service pack to the installation. Taking into consideration Windows XP as an example the steps to be carried out are as indicated below.
With the completion of these steps the CD inside the WIN_XP_CD directory includes the service pack 2 and during the installation extracts the service pack 2 automatically and performs the installation without further work. Using the same commands the related service packs can be integrated to other Windows versions. 2.2 Adding the update files to the Microsoft Windows installation: The windows installation CD at hand is not at its final stage, after the integration of the service pack. Critical update files released by Microsoft since the last service pack will have to be incorporated with the installation CD. The updates since the last SP will have to be downloaded to the local disk. Then, there are two ways to perform the updates during the installation: Integrating the updates with the installation: The downloaded update file is run with the /integrate:path command. For example if
the update file is WindowsXP-KB891781-x86-ENU.exe and the installation file on the local disk is in C:\WIN_XP_CD directory, then the
command
to be used is as follows: Running the updates after the installation: For this function, the file in [GuiRunOnce] section of winnt.sif has to be created or the contents be changed. A detailed explanation about this will be given within the next heading. 2.3 The automatic installations to be done after the Microsoft Windows installation:
$Docs: Under the Documents and Settings directory In this case the %systemdrive%\install\install.cmd written on the [GuiRunOnce] section of the winnt.sif file will make the install\install.cmd file, which is located on the disk Windows is installed, run after the installation is finished. All the programs to run after the installation is over should be indicated in this file. With this file various Windows updates can be installed as well as the automatic installation of other programs. For every update or program to be installed on the install.cmd file the commands related to how the installation will be performed for that
update or program should be recovered and written. For instance if it is not desired to integrate Windows updates to the basic installation and it is
preferred to install them later the below command may be used:
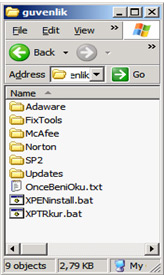
Here, the KB893803.exe file is located in the $OEM$\$1\install directory on the CD and is saved in the install directory of the disk Windows is installed on. The start /wait command prevents the command for the next file to run before this command is executed. The /q, /n and /z commands respectively provide info on the installation to be done automatically, not to backup the files changed during installation, and not to reboot the computer after the installation is completed. Even though these commands are used in almost all Windows updates it would be helpful to follow up the commands to be used from the official Internet Site for Microsoft for each and every update introduced. Besides the updates, other software may similarly be installed by finding their silent installation commands. To give an example, the two commands needed for auto installation of the licensed anti-virus software, McAfee, for METU and the installation of its current virus definition files is shown below:
These and other similar commands can be recovered from the related software web sites or by a simple search on the Internet. After all the updates and software installation the computer needs to be started again and for this the below command may be incorporated in the install.cmd file.
The commands -r, -f and -t 10 on this line respectively are; the computer will restart after shutdown, all the running processes will be ended without confirmation and in ten seconds. The command -c is used to inform the user. Below is a sample of the install.cmd file:
3. THE SECURITY SETTINGS It must primarily be understood that viruses have the tendency to spread within the network. The chance of viruses entering a computer after the standard Windows XP operating system installation is very high since the updates have not been installed. These computers are prone to virus attacks and other security risks once they are connected to the Internet. To prevent the spread of viruses from such computers in the METU Campus, a CD has been prepared that can perform the operating system updates and antivirus software updates automatically without being online (without connecting the internet or the network) after the installation of the standard Windows XP operating system. The contents of the security CD:
For a secure computer it should be kept in mind that the operating system of the computer which constitutes the foundation must be strong. If the foundation is loose whatever is constructed on it will not be safe. The computer after the installation of Windows XP operating system, for instance, includes gaps enabling outside attacks. The antivirus software to be used is nothing but installing protection to a weakly founded operating system. This will never provide the necessary security. The initial thing to do is to block the gaps in the operating system. Firstly, updates should be carried out, then the services or applications that can be harmful which run after standard installation must be stopped. Ports mostly made use of during attacks: 135: DCOM servisi, SCM (Service Control Manager) To disable these ports it is necessary to shut down some service or services and make some changes in the Windows registry. 135: is the port the DCOM service uses. Shutting down this port needs the DCOM service to be ended for this the command to be used is:
From the services running on the computer the service named "DCOM Server Process Launcher" is ended. 137: is the port Netbios Name Service uses. To shut down this port DCOM service should be stopped.
From this screen "advanced options" is selected and from the "wins" tab "NETBIOS Over TCP/IP" is cancelled.
In the "Parameters" directory the value of "SmbDeviceEnabled" is changed to "0". In our next issue 'how to prepare a multimedia DVD that contains different operating systems' will be discussed. Presented on Akademik Bilişim 2007. Selçuk Han Aydın - Ulaş Canatalı - Hasan Nadir Derin |
|||||||||||||||||||||||||||||||||||||||||||||||||
| - TOP - |
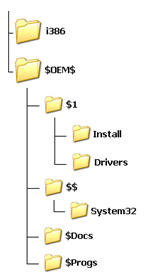 When a directory structure like the one shown in
the picture is created in the Windows XP installation CD, during the installation the files inside these directories are copied to the local disk as
shown below:
When a directory structure like the one shown in
the picture is created in the Windows XP installation CD, during the installation the files inside these directories are copied to the local disk as
shown below:
 - SP2 (The directory containing the Service
pack 2 files)
- SP2 (The directory containing the Service
pack 2 files)